Garrattfan's Modelrailroading Pages
OO9 NGG16
Chapter 9 Detailing (3)
|
Building manual chapter 09 |
|
|
|
Washout plugs |
|
| With the various parts I ordered in March were washout plugs. In the prototype they are conspicuously present, yet none were included in the kit. | |
 |
A photo taken on the Aberglaslyn pass of No 87 shows the brass washout plugs clearly. I decided to model the most obvious |
 |
The washout plugs are turnings. Very nice and accurate. They have round heads though instead of square ones. Ok, I'll accept that as a compromise |
 |
Holes marked for drilling. |
 |
Accurate drilling is paramount because the flanges of the washout plug mount are extremely thin. |
 |
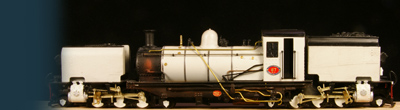
Final result. The end result will be quite obvious once the boiler has been painted. I left out some plugs. Two were on almost invisible places, one on a place I already made inacessible, two on the edge of the fire box, the latter being almost impossible to install neatly. Of seventeen plus I modeled twelve (that's for the rivet counters amongst us :-o ) |
Installing remaining (boiler) gear |
Well, at last time has come to make the final installations and finish the detailing stage |
 |
Valves (before cleaning ;-) |
 |
Dome and generator. The generator was bought new to replace the white metal one supplied with the kit |
 |
Stack |
 |
Lever for the ashpan.The connecting rod will be atttach only after painting, when the boiler assy and the cradle are permanently mated. |
 |
The boiler also carries some pipe bundles... |
 |
...which are simulated as well. The trick is ti make each consecutive bend a little wider. Each of de wire is left a little longer so I can see easily which is the inside and which is the outside wire. After bending a small touch of the soldering iron makes it all complete. Bending is a delicate process, risking breaking up the lot. But some trials it worked. |
| Return to Detailing page 1 Return to Detailing page 2 |
|

Sign my
GuestBook